Guidebooks
A guidebook is a digital welcome book for a property: WiFi details, access codes, house rules, local recommendations, check-out instructions and more, all in one place. Guests reach it from their booking portal (see The guest portal).
There are two kinds:
- A property's own guidebook — created from the Guidebook tab on that property.
- The overall guidebook — one per account, reached from Guidebook in the left-hand menu. Its pages are added to every property's guidebook, so you write shared information once.
How a guidebook is put together
A guidebook has three layers:
- The guidebook — its title, intro text and the master Published switch.
- Pages — each one a separate screen the guest can open, e.g. "Getting in", "House rules", "Around the area".
- Blocks — the actual content on a page: a WiFi block, an access-code block, a local recommendation, and so on.
Blocks sit on pages, not directly on the guidebook. So the first thing you do in a new guidebook is add a page.
Creating a guidebook
Open a property from the Properties page and go to the Guidebook tab. If the property has no guidebook yet you'll see a Create guidebook button — clicking it starts a guidebook titled "Welcome to your stay" that you can rename. Once created, the editor appears.
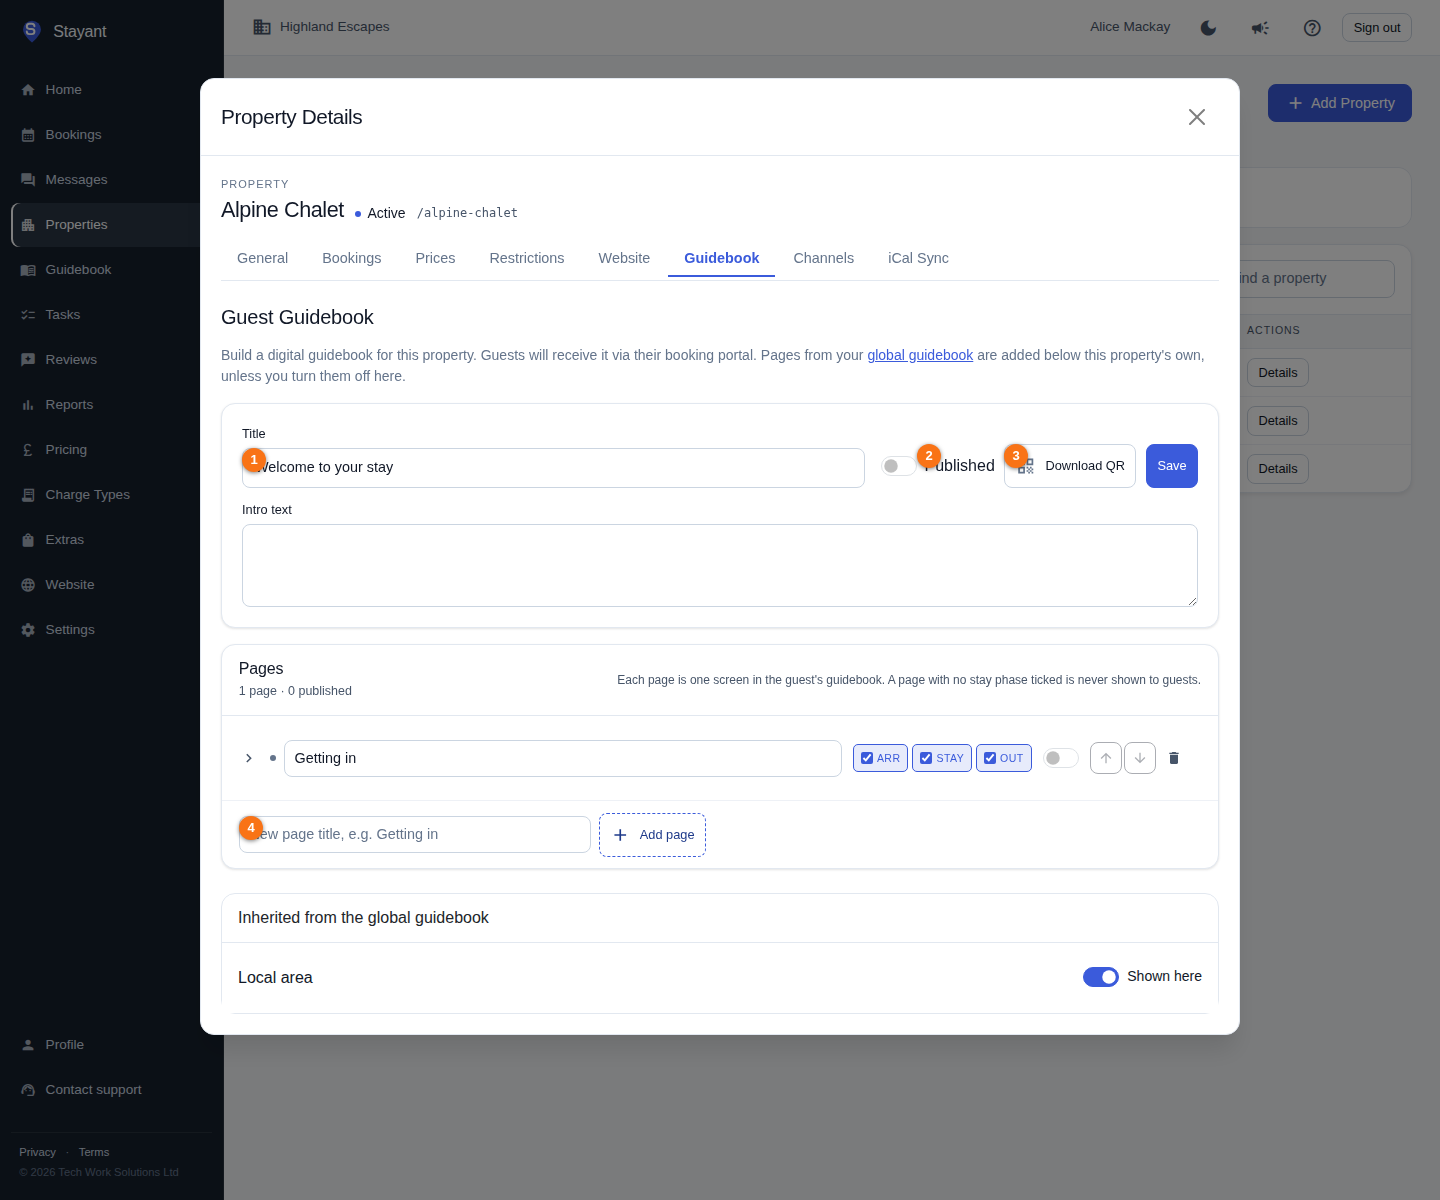
At the top of the guidebook you can set:
- Title (①) — the heading guests see.
- Intro text — a short welcome message shown under the title.
- Published (②) — the master switch. Nothing in this guidebook reaches guests while it is off, no matter what the individual pages say.
- Download QR (③) — generates a QR code you can print and leave in the property (see The printed QR code).
Below the header sits the Pages list, and below that the Add a page box (④).
Click Save to store those header changes. Everything below the header — pages, their switches and their blocks — saves as soon as you change it; there's no separate Save for the page list.
Pages
Under the header is the Pages list.
- Add a page — type a name in the box at the bottom (e.g. "Getting in") and click Add page. Leave the box empty and the page is called "New page". A new page opens straight away so you can start adding blocks.
- Rename — type over the page's name in the list; it saves when you click away.
- Reorder — the up and down arrows move a page in the list. Guests see pages in this order, with the property's own pages first and the overall guidebook's pages after them.
- Delete — the bin icon removes the page and everything on it.
- Expand — the arrow on the left opens the page so you can edit its content.
When a page is expanded you get:
- Summary — an optional one-liner shown under the page's name in the guest's list. Use it to say what's on the page ("Door code, parking, bins").
- Available placeholders — a reference list of the merge fields you can drop into the content (see Placeholders below).
- The blocks on that page — see Adding content blocks below.
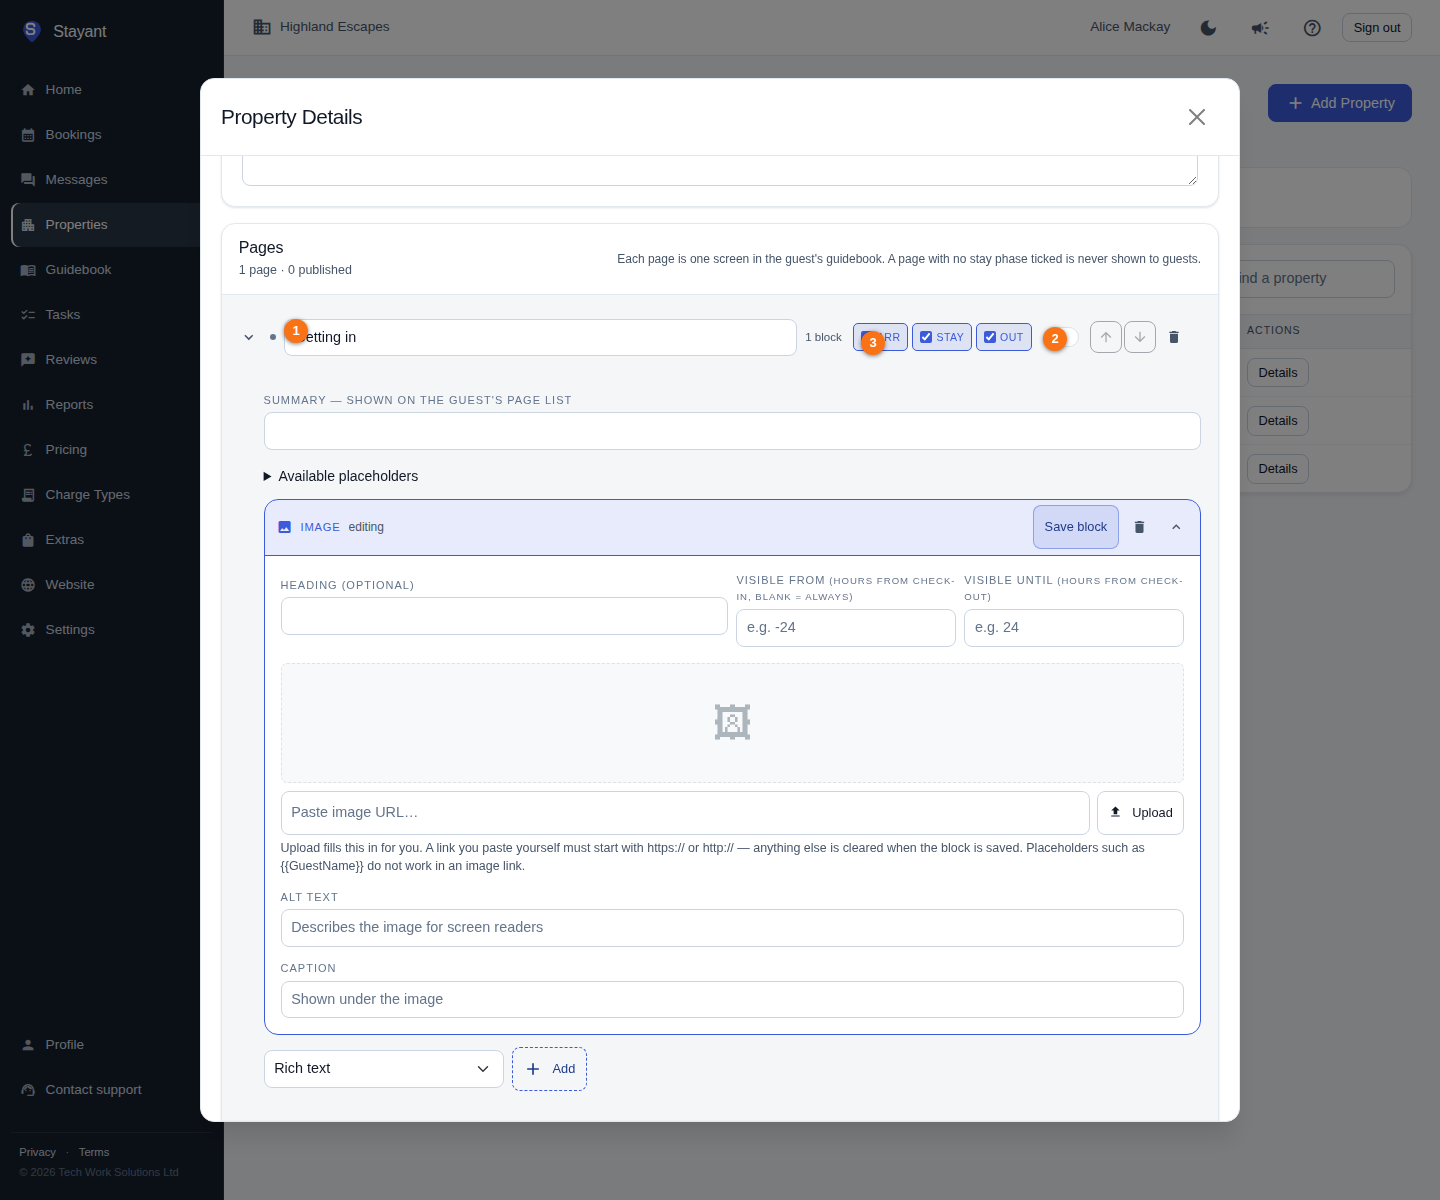
On each page row you get the page's name (①), its own Published switch (②) and the three stay-phase tick-boxes (③) covered in the next two sections.
Publishing: two switches, both must be on
Publishing works at two levels:
- The guidebook's Published switch, in the header card.
- Each page's own Published switch, on its row in the list.
A page only reaches guests when both are on. A new page starts unpublished, so you can build it out in peace and publish it when it's ready — the rest of the guidebook stays live in the meantime.
When guests see a page
Each page row has three tick-boxes that decide which part of the stay the page shows in. On the row they're the small Arr, Stay and Out chips — a chip is filled when it's ticked. All three are ticked on a new page.
| Tick-box | The guest sees the page… |
|---|---|
| Before arrival | from the moment the booking exists until their check-in time |
| During stay | between their check-in time and their check-out time |
| After checkout | after their check-out time |
Check-in and check-out times come from the property's default check-in / check-out times, read in the property's time zone, so "during stay" starts and ends at the times you've set for that property, on the property's own clock. The time zone is on Properties → the property → General → Edit, under the check-in and check-out times; every property starts on UK — London. If a property is abroad, set its zone so a 16:00 check-in means 16:00 there.
Some ways to use this:
- A "Getting in" page with only Before arrival and During stay ticked disappears once the guest has gone home.
- A "How to check out" page with only During stay ticked doesn't clutter the pre-arrival view.
- A "Leave us a review" page with only After checkout ticked appears exactly when it's useful.
A page with all three ticked is the only kind that also shows on the printed QR code — see Who sees what: booking link vs printed QR code below. A page with only some ticked is for booked guests only.
Untick all three and the page is never visible to anyone. The editor shows an orange "Never visible to guests" badge on that row so you can't do it by accident. It's allowed on purpose — it's a way to park a page you're not ready to retire without deleting its content.
Adding content blocks
Expand a page, choose a type from the Add a new block dropdown and click Add, then fill it in and click Save block. Available block types:
- Rich text — free-form text you can format (see Formatting your text below).
- WiFi credentials — network name (SSID) and password. Only shown to a booked guest, during their stay.
- Access code — a code plus optional notes (e.g. lockbox location). Only shown to a booked guest, during their stay.
- House rules — free-form text you can format.
- Local recommendation — place name, address, a description you can format, a website link and a maps link.
- Emergency contact — name, role, and phone number.
- Inventory — what's provided, written as a formatted list.
- Check-out instructions — free-form text you can format.
- Image — a photo you upload or link to, with alt text and a caption (see Adding an image).
- Map — a map to embed, plus an address and an optional Get directions button (see Adding a map).
Each block also takes an optional Heading. Blocks appear in the order they were added; delete one with the bin icon on its header.
Formatting your text
The text boxes on Rich text, House rules, Check-out instructions and Inventory blocks — and the Description on a Local recommendation — are proper editors with a toolbar, not plain boxes. You can use:
- Headings — to break a long block into sections.
- Bold, italic, underline and strikethrough.
- Bulleted and numbered lists — so a set of house rules really does read as a list.
- Links — select some words, click the link button and paste the address.
- Quotes and code blocks for anything you want set apart.
- Clear formatting — strips a selection back to plain text. Handy after pasting from Word or a website, which often brings its own formatting with it.
Formatting is saved with the block and shown to the guest exactly as you set it — every button on the toolbar carries through to the guest's guidebook.
There's deliberately no colour, highlight or alignment control. Colours, spacing and alignment come from the guidebook's own design, so every page looks consistent whichever property it belongs to. Use headings and lists for structure instead.
Everything you type is checked when the block is saved, and anything that isn't ordinary formatting is quietly removed. In practice you'll never notice; it only matters if you try to paste in an embedded widget or a video player copied from another site's page source, which won't survive the save. Use a Map or Image block for that sort of thing instead.
Links you paste in
Wherever you can add a link — the link button in a text editor, the Website URL and Maps URL on a local recommendation, the map's Directions link — the address has to be a real web or contact address:
https://…orhttp://…for a web page.mailto:[email protected]for an email link, ortel:+441234567890to dial a number.
Anything else is cleared when you save the block, without an error message — so if a link disappears after saving, check that it starts with one of those. The safest habit is to copy the address out of your browser's address bar rather than typing it.
Placeholders such as {{GuestName}} do not work inside a link address or an image address — they're removed when the block is saved. They work normally in the words you're linking from, and everywhere else on the page. So link the words "email us" to a fixed mailto: address and put {{GuestFirstName}} in the sentence around it, rather than trying to build the address itself out of a placeholder.
Adding an image
An Image block has two ways to get a picture in:
- Upload — click Upload and pick a file from your computer or phone. Stayant stores it for you and fills the address box in automatically. JPEG, PNG, WebP, GIF, HEIC and HEIF files up to 10 MB are accepted.
- Paste a link — if the photo is already online, paste its web address into the box instead. It must start with
https://orhttp://.
A thumbnail appears above the box once there's a picture, so you can check you've got the right one.
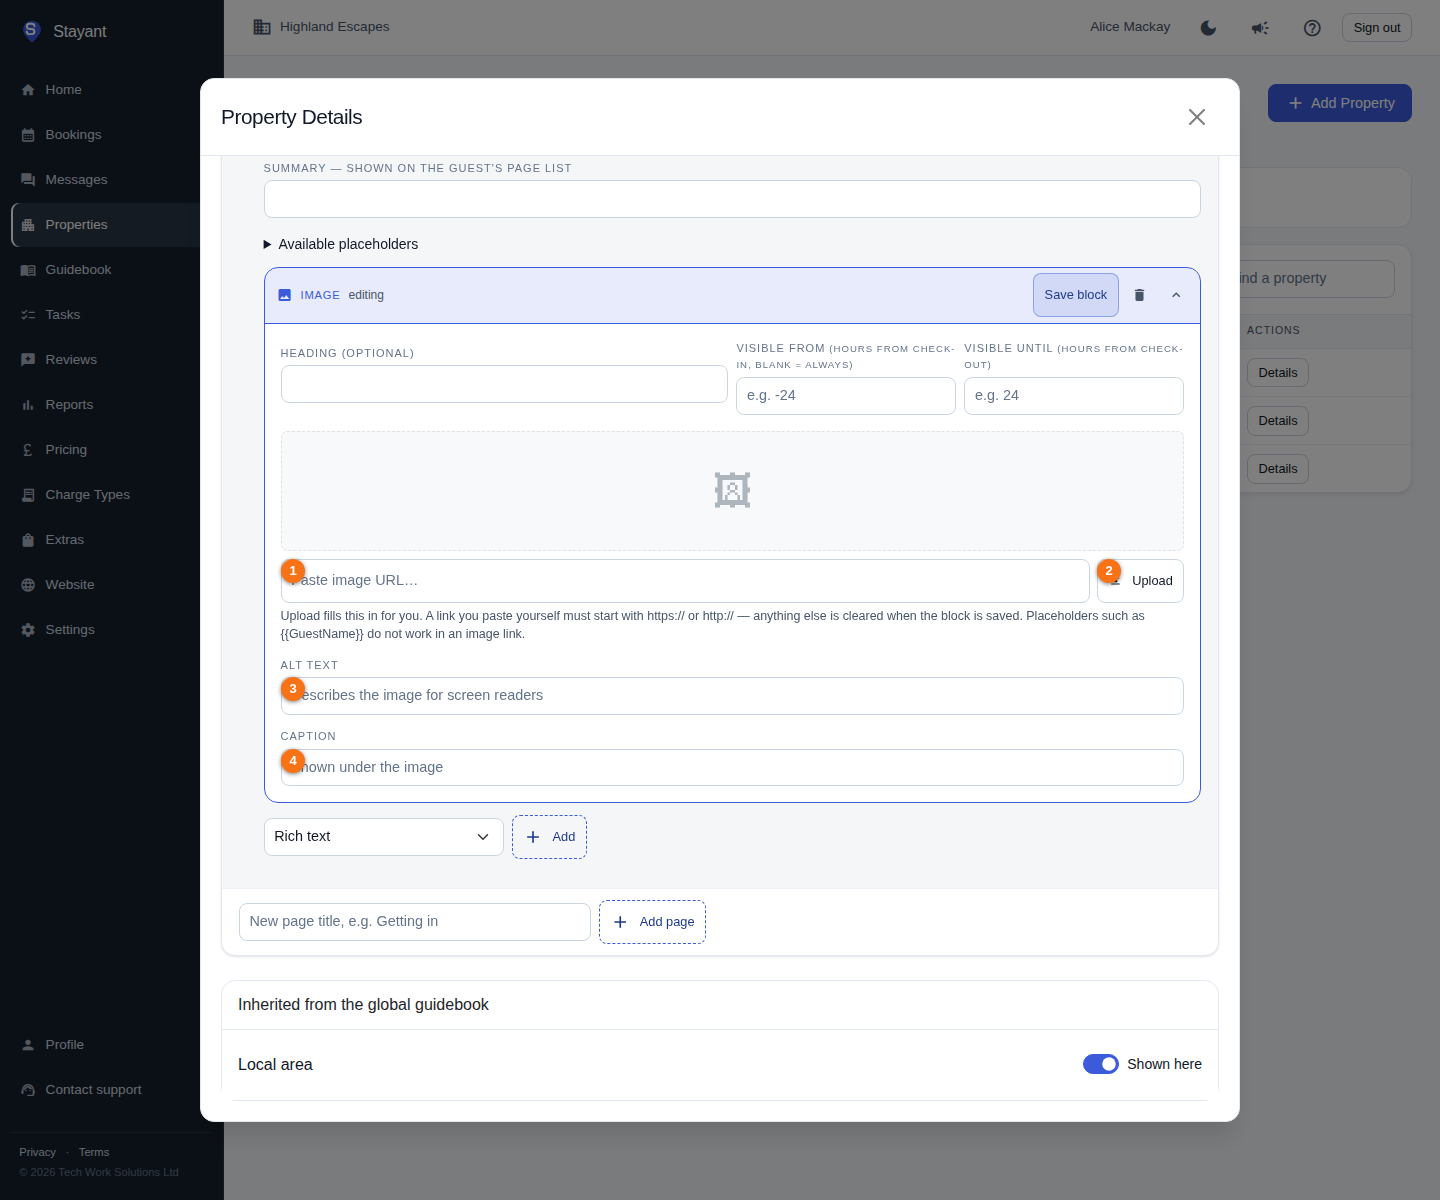
Paste an address into the box (①) or click Upload (②) to pick a file. Underneath are two separate fields — Alt text (③) and Caption (④) — and they do different jobs:
- Alt text — a short description of what's in the picture, for guests using a screen reader, and shown if the image fails to load. It is not displayed on the page. "Front door with the key safe on the left-hand wall" is useful; "photo" isn't.
- Caption — a line of text shown to everyone, underneath the image.
Fill in both where you can. If you leave alt text blank, the caption is used in its place; if both are blank the image is treated as decorative and screen readers skip it.
Adding a map
A Map block has four fields:
- Map embed URL — the map itself. In Google Maps, use Share → Embed a map and copy the address out of the code it gives you.
- Address — shown as a line of text under the map. Worth filling in even if the map loads, since it's what a guest can copy into their own sat-nav.
- Directions link — a link that opens directions to the property, e.g. from Google Maps' Directions screen.
- Show a "Get directions" button — tick this and the directions link appears as a button under the map. Leave it unticked and the link is kept but not shown.
Timed blocks inside a page
As well as the page's own three tick-boxes, each block has two optional timing fields:
- Visible from — hours from check-in. A negative value means before check-in (e.g.
-24reveals the block 24 hours before arrival). Leave blank to always show it. - Visible until — hours from check-out (e.g.
24keeps it visible for a day after departure).
The two settings stack. A block is only shown when its page is visible and the block is inside its own time window. So a page ticked for Before arrival and During stay with a local-tips block set to Visible from -24 shows the tips from the day before arrival.
WiFi credentials and Access code blocks work slightly differently: with both fields blank they show only during the stay — from check-in time to check-out time — rather than always. The fields move those edges: Visible from -2 on an access-code block shows the code from two hours before check-in, and Visible until 1 keeps it for an hour after check-out.
If every block on a page is still time-hidden, the page itself drops out of the guest's list and is counted in the "more pages are coming" note instead. If a guest has bookmarked that page's link, opening it tells them the content isn't available yet rather than showing an error.
The overall guidebook
Some information is the same wherever a guest stays — your welcome message, an emergency contact number, recommendations for the area. Rather than repeating it in every property's guidebook, put it on the overall guidebook.
Open Guidebook in the left-hand menu. It works exactly like a property guidebook: give it a title and intro, add pages, add blocks to them, and switch Published on when you're ready. (Inside a property's Guidebook tab this is referred to as your global guidebook — same thing.)
Its pages are added to every property's guidebook, after that property's own pages — so during their stay a guest still sees their WiFi details and door code first, with your shared pages underneath.
A property doesn't need a guidebook of its own for this to work. If only the overall guidebook is published, guests staying at that property see its pages on their own.
Applies to — targeting a shared page at some properties
A page on the overall guidebook has one extra setting the property guidebooks don't: Applies to.
| Setting | Which properties get the page |
|---|---|
| All properties | every property (the default) |
| All properties except | every property apart from the ones you tick |
| Only these properties | just the ones you tick |
Pick one of the last two and a list of your properties appears underneath so you can tick the ones to exclude or include.
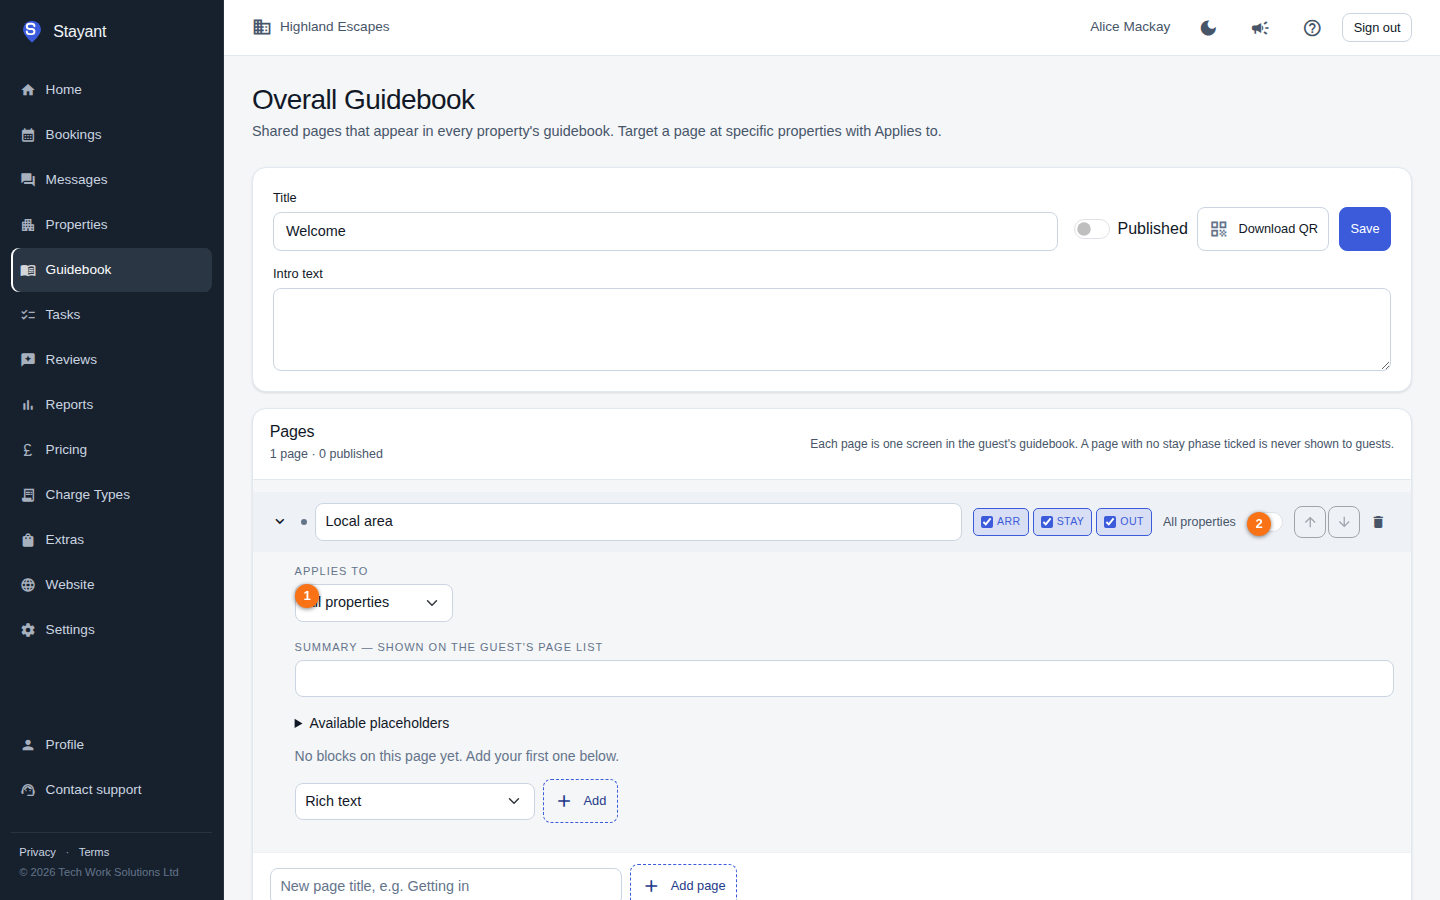
Applies to (①) sits under each page's Published switch and stay-phase tick-boxes (②), which work exactly as they do on a property's own pages.
Use it when something is nearly universal: a "Parking" page that applies to every property except the city-centre flat, or a "Beach kit and tide times" page for your two coastal cottages only.
Two things to know:
- Applies to only exists on the overall guidebook. A property's own pages already belong to one property, so there's nothing to target — the setting isn't shown there.
- Changing the mode clears the list. Switching from "All properties except" to "Only these properties" empties the ticks, so you pick again deliberately. Carrying the list over would silently invert what it meant.
Turning a shared page off for one property
You can also set this from the property's side, which is usually more natural when you're already looking at one property.
Open Properties → the property → Guidebook and scroll to Inherited from the global guidebook. Every page on the overall guidebook is listed with a switch reading Shown here or Hidden here. Flipping it just edits that page's Applies to for you — turn it off and the page moves to "All properties except this one"; turn it back on and this property is removed from the exclusions.
It's the same setting seen from the other end, so a change made here shows up on the overall guidebook page, and vice versa.
What the guest sees
A guest opens the guidebook from the Guidebook card at the top of their booking portal. The page shows the property name, the guidebook's title and intro text, and their stay dates.
Below that:
- With more than one page visible, they get a tap-list — one card per page with its name and summary — and open one page at a time. Each page has a Back to guidebook link.
- With exactly one page visible, that page's content is shown straight away, with no list to tap through. This is why guidebooks that existed before pages were added look unchanged to guests.
- With nothing visible yet, they see "More information will appear here closer to your arrival."
If some pages aren't showing yet because of their stay phase or a timed block, a line underneath says how many more are coming — for example "2 more pages will become available based on your stay timeline." Inside a page, timed blocks that aren't showing yet get a similar line ("1 additional section will become available…"). Pages excluded by Applies to are deliberately not counted: they're never coming, so promising them would make the guest wait for nothing.
Who sees what: booking link vs printed QR code
There are two ways into a guidebook, and they deliberately show different things:
| The guest's booking link (guest portal → Guidebook) | The printed QR code | |
|---|---|---|
| Who can open it | Only the guest the booking link was sent to | Anyone who scans or photographs the code |
| Pages | Follow their Before arrival / During stay / After checkout tick-boxes | Only pages with all three ticked |
| WiFi and access-code blocks | During the stay (check-in time to check-out time, in the property's time zone), plus any Visible from / until hours you set | Never |
{{PropertyPin}} |
The real code during the stay; "(shown in your booking link during your stay)" otherwise | "(shown in your booking link during your stay)" |
| Timed blocks | Shown inside their window | Never |
The printed QR code shows a note at the top — "Door codes and Wi-Fi details aren't shown here" — pointing guests to their booking link, so nobody is left hunting for a password that isn't there.
Booking links you've already sent keep working exactly as before: a guest who opens theirs during the stay sees the door code and WiFi. After check-out the link still opens (for your after-checkout pages and review requests), but no longer shows access details. A cancelled booking's link never shows them.
Blocks are rendered for their type — WiFi shown as network/password, an access code shown large and centred, local recommendations with Visit website / Open in maps buttons, emergency contacts with a tap-to-call button, images with their caption underneath, and so on. Text blocks (including Inventory) keep the headings, lists, bold and links you gave them. A map is shown as an embedded frame with the address beneath it, and a Get directions button if you ticked that box.
Upgrading an existing guidebook
If you had a guidebook before pages existed, nothing has been lost. Its blocks were moved onto a single page called General information, already published and ticked for all three stay phases — so your guests see exactly what they saw before. Rename it, split it into more pages, or leave it as it is.
A guidebook that had no blocks at all didn't get a page, so you won't find an empty page you never created.
One change to watch: Inventory blocks
Inventory used to be a plain box where you wrote one item per line. It's now the same formatting editor as the other text blocks, so you can make a proper bulleted list, add headings ("In the kitchen", "In the bathroom") and bold the important bits.
Nothing you've already written has changed. An existing inventory still shows guests exactly what it showed them before — one item per line — and when you open the block your text is already sitting in the new editor, ready to edit. It stays that way until you edit and save the block; from then on it's stored as formatted text. So if you want bullets, open the block, select the lines and click the bulleted-list button, then Save block.
The same goes for every other text block: what you wrote before still reads as it did, and picks up the new formatting the first time you use it.
The printed QR code
Download QR gives you a PNG you can print and leave in the property — on the fridge, in a welcome folder, beside the door. Scanning it opens the guidebook straight in a phone browser, with no booking reference and nothing to log in to. It behaves like the guest view: a tap-list when several pages qualify, the content inline when only one does.
Anyone who scans a printed code can read it — including someone who photographed it on a previous stay — so it only ever shows your general information. Door codes and WiFi are never on it; guests get those from their own booking link during their stay (see Who sees what above).
Things to know before you print:
- Publish first. The QR code is generated whether or not the guidebook is published, but the page it opens only shows a published guidebook, and only its published pages. Scanning a QR for an unpublished guidebook shows "not found".
- Only pages ticked for all three stay phases appear. A page limited to During stay (or any other subset) is for booked guests, so it's left out.
- WiFi and access-code blocks are always left out, even on an all-phases page, and
{{PropertyPin}}reads "(shown in your booking link during your stay)". - Timed blocks are left out. With no arrival date there's nothing to measure "24 hours before check-in" against, so blocks with a Visible from or Visible until value are not shown. The page tells the reader how many pages are booking-only. If something matters to everyone who walks in, leave its timing fields blank.
- The overall guidebook has its own QR, showing just its pages set to All properties. A page aimed at particular properties with Applies to is left out, because there's no property behind that code. A property's QR shows the property's own pages plus the shared pages targeted at it.
- Don't type codes into ordinary text. Stayant hides the WiFi and access-code blocks and the
{{PropertyPin}}placeholder, but it can't tell that a sentence in a text block is a password. Put codes in an access-code or WiFi block, or on a page ticked for During stay only.
Placeholders (merge fields)
Guidebook content supports the same placeholders as your message templates — tokens in double braces that Stayant swaps for the real value when a guest opens the guidebook. So you can write "Welcome, {{GuestFirstName}} — your stay at {{PropertyName}} runs to {{CheckOutDate}}" once and have it read correctly for everyone.
Placeholders work in the guidebook's Title and Intro text, in a page's name and summary, in a block's Heading, and in every text field on a block.
The one place they don't work is inside a link address or an image address — see Links you paste in above. Put the placeholder in the words you're linking from instead.
| Placeholder | What it inserts | Example |
|---|---|---|
{{GuestName}} |
Guest's full name | Jane Smith |
{{GuestFirstName}} |
Guest's first name | Jane |
{{GuestEmail}} |
Guest's email address | [email protected] |
{{GuestPhone}} |
Guest's phone number | +44 7700 900123 |
{{PropertyName}} |
Property name | Sea View Cottage |
{{TenantName}} |
Your business / operator name | Cornish Coastal Lets |
{{BookingReference}} |
Booking reference number | STY-0042 |
{{BookingStatus}} |
Booking status | Confirmed |
{{BookingSource}} |
How the booking was created | Direct |
{{OtaName}} |
OTA/source code for a channel booking | BDC |
{{ExternalBookingUniqueId}} |
OTA external booking identifier | BDC-123456789 |
{{CheckInDate}} |
Check-in date | 12 Jun 2025 |
{{CheckOutDate}} |
Check-out date | 19 Jun 2025 |
{{CheckInDayOfWeek}} |
Check-in weekday name | Thursday |
{{CheckOutDayOfWeek}} |
Check-out weekday name | Thursday |
{{Nights}} |
Number of nights | 7 |
{{StayLength}} |
Human-readable stay length | 7 nights |
{{Adults}} |
Number of adults | 2 |
{{Children}} |
Number of children | 1 |
{{TotalGuests}} |
Total number of guests | 3 |
{{BookingNotes}} |
Internal booking notes | Late arrival after 10pm |
{{AccommodationTotal}} |
Accommodation cost | £700.00 |
{{ChargesTotal}} |
Total charges / extras | £75.00 |
{{Discount}} |
Booking discount, shown as a minus amount (blank if none) | -£50.00 |
{{DiscountDescription}} |
Why the discount was given (blank if none) | Returning guest |
{{SalesTax}} |
Sales tax / VAT on the booking | £45.00 |
{{GrandTotal}} |
Total cost including charges | £775.00 |
{{AmountPaid}} |
Amount already paid | £232.50 |
{{BalanceOutstanding}} |
Remaining balance | £542.50 |
{{BalanceDueDate}} |
Balance payment due date | 29 May 2025 |
{{PaymentStatus}} |
Current payment status | PartPaid |
{{ExtrasList}} |
Bullet list of extras on the booking | • Cot Hire × 1 — £25.00 |
{{GuestPortalLink}} |
Guest portal URL | https://stay.example.com/guest/abc123 |
{{CheckInLink}} |
Guest check-in form URL | …/guest/abc123/check-in |
{{PaymentLink}} |
Guest payment URL | …/guest/abc123/pay |
{{GuidebookLink}} |
Guest guidebook URL | …/guest/abc123/guidebook |
{{MessagesLink}} |
Guest messages URL — where guests reply | …/guest/abc123/messages |
{{PropertyPin}} |
Property access PIN / door code — only during the stay; otherwise "(shown in your booking link during your stay)" | 4827 |
{{PropertyAddress}} |
Property's full address, on one line. Blank until you add one on the property's General tab. | 12 Lake Road, Keswick, Cumbria, CA12 4AB, United Kingdom |
Two further placeholders — {{PaymentAmount}} and {{ChargeDate}} — are only filled in on the payment messages that carry them. There is no single payment behind a guidebook, so don't use those two here: they'd be left on the page exactly as you typed them.
Conditional blocks
As in message templates, you can show part of the text only when a placeholder has a value, by wrapping it in {{#if Token}}…{{/if}}. An empty value — and a literal "0" — count as "no value":
Your party of {{Adults}} adults{{#if Children}} and {{Children}} children{{/if}} is booked in.
That hides "and 0 children" entirely for a couple travelling alone.
Placeholders on the printed QR guidebook
The printed QR code has no booking behind it, so there is no guest name or arrival date to fill in. Rather than showing a reader raw {{GuestFirstName}} braces, Stayant renders those placeholders as nothing at all, and {{#if …}} blocks around them collapse away. The one exception is {{PropertyPin}}, which reads "(shown in your booking link during your stay)" so a sentence like "The key safe code is {{PropertyPin}}" still makes sense.
That's tidy, but it means a sentence built around a placeholder can read oddly on a printed sign — "Welcome, ," instead of "Welcome, Jane,". If a page is meant to be read from a printed code as well as from the portal, either keep placeholders off it or wrap them so the whole sentence disappears:
{{#if GuestFirstName}}Welcome, {{GuestFirstName}}!{{/if}}
Related
- The guest portal — where guests open the guidebook from.
- Editing message templates — the same placeholders, in your automated emails.