Choosing payment processors
This page controls which payment methods guests can use to pay for a booking and the order they appear at checkout. It works alongside the individual processor pages (Stripe, PayPal, Bank transfer) — those connect each method, while this page decides which of them guests actually see.
Open Settings → Payment processors (/settings/payment-processors).
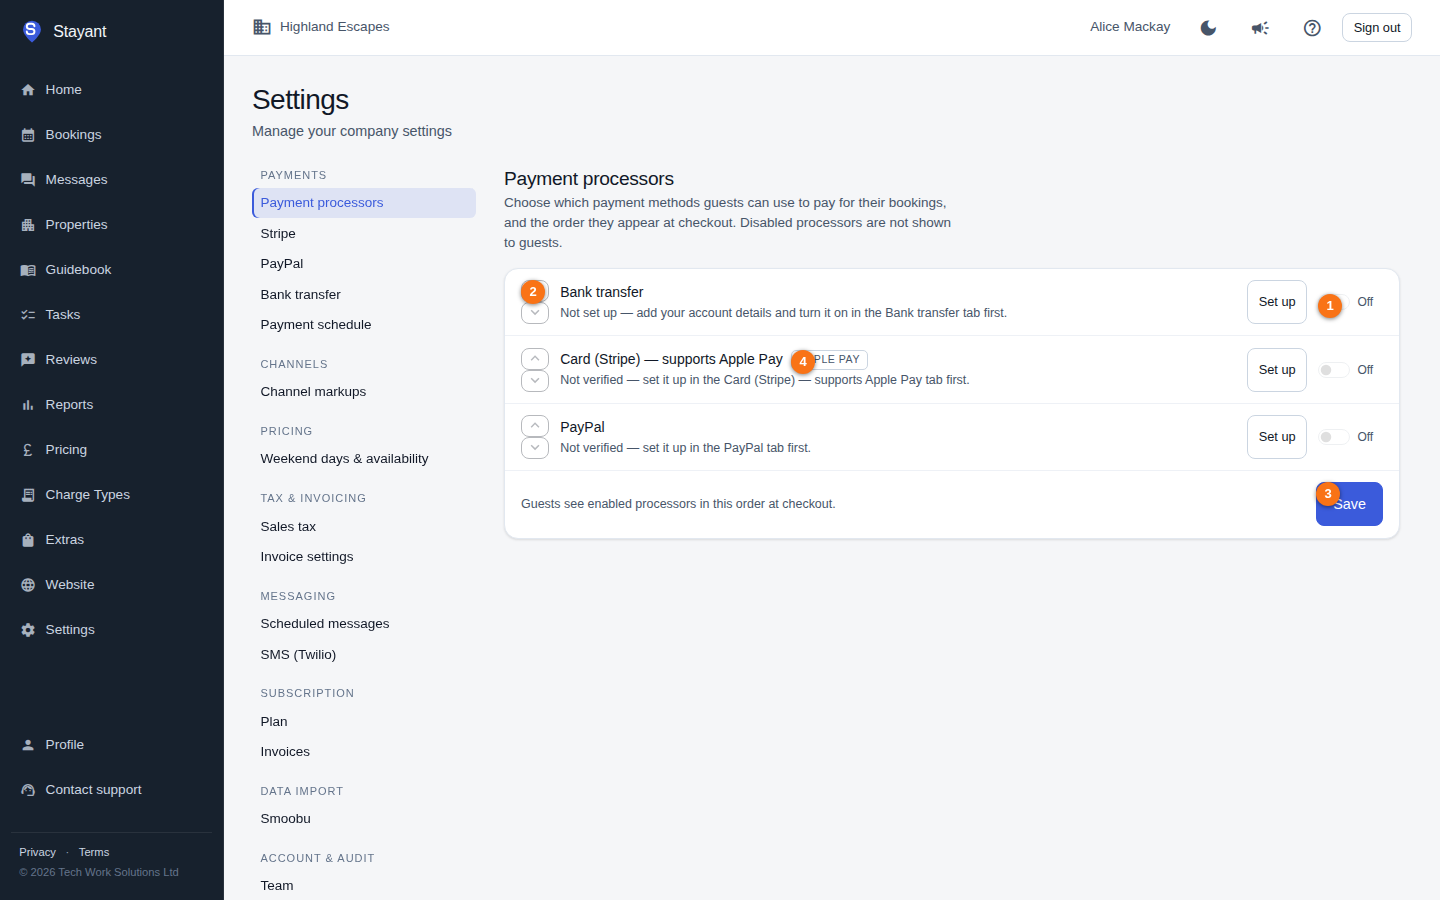
You'll see a list of the available payment methods. Each has an On/Off switch (①) and a pair of reorder arrows (②), and a Save button (③) sits below the list. Some processors carry an Apple Pay badge (④) where they can offer Apple Pay on supported devices. Each row also has an Edit link (or Set up, if the processor isn't ready yet) that jumps straight to that processor's own settings tab.
Enabling and disabling processors
- Switch a processor On (①) to make it available to guests at checkout.
- Switch it Off to hide it — disabled processors are not shown to guests.
The list only shows the payment methods your subscription plan includes. If a processor (for example PayPal) isn't part of your current plan it won't appear here at all — upgrade your plan under Settings → Plan to unlock it. See Your plan in the Subscription category.
Some processors carry an Apple Pay badge (④), indicating they can offer Apple Pay where the guest's device supports it.
A processor that isn't ready yet is greyed out and can't be switched on, with a note saying why. Use the row's Set up link to fix it:
- Stripe — shows Not verified — set it up in the … tab first until it passes its live credential check. Click Connect with Stripe and complete Stripe's onboarding. It can be switched on here as soon as Stripe confirms your account can take charges. There are no API keys to paste.
- PayPal — same Not verified note. Enter your credentials and click Save & verify.
- Bank transfer — shows Not set up — add your account details and turn it on in the … tab first. There are no credentials to verify, so instead it needs an account name plus either an IBAN or a UK sort code and account number saved under Settings → Bank transfer, and Enable bank transfer payments ticked there. Both are required before it can be switched on here.
See Connecting Stripe, Connecting PayPal and Bank transfer payments for details.
If a processor was enabled previously but later stops being usable — a credential change that loses Stripe/PayPal verification, or bank details cleared out — it shows here switched off and greyed out, not enabled. Guests are never offered a processor that can't currently take payment, so they can't reach a dead end at checkout.
Setting the order
The order of the list is the order guests see at checkout. Use the up (Move up) and down (Move down) arrow buttons (②) next to each enabled processor to arrange them. Enabled processors sort to the top in your chosen order; any disabled ones follow underneath.
Put the method you most want guests to use first.
Saving
Click Save (③) to apply your choices. A confirmation message appears when the changes are stored.
Enabling a processor here only offers it if that method is also configured and enabled on its own settings page. For example, switching on the card processor has no effect until Stripe is connected and enabled under Settings → Stripe.