Connecting PayPal
Connect your PayPal account to take PayPal payments from guests. Once configured and enabled, PayPal becomes available at checkout (subject to the processors you allow — see Choosing payment processors).
Open Settings → PayPal (/settings/paypal).
In the Update Credentials card (on the right), enter your Client ID (①), Secret (②), and Webhook ID (③). Use the Live mode (uncheck for Sandbox) checkbox (④) to say which set of credentials you've entered — tick it for live, leave it unticked for Sandbox. Then click Save & verify (⑤). Once verification succeeds, tick Enable PayPal payments and save again — the Enable checkbox stays disabled until PayPal has verified your credentials.
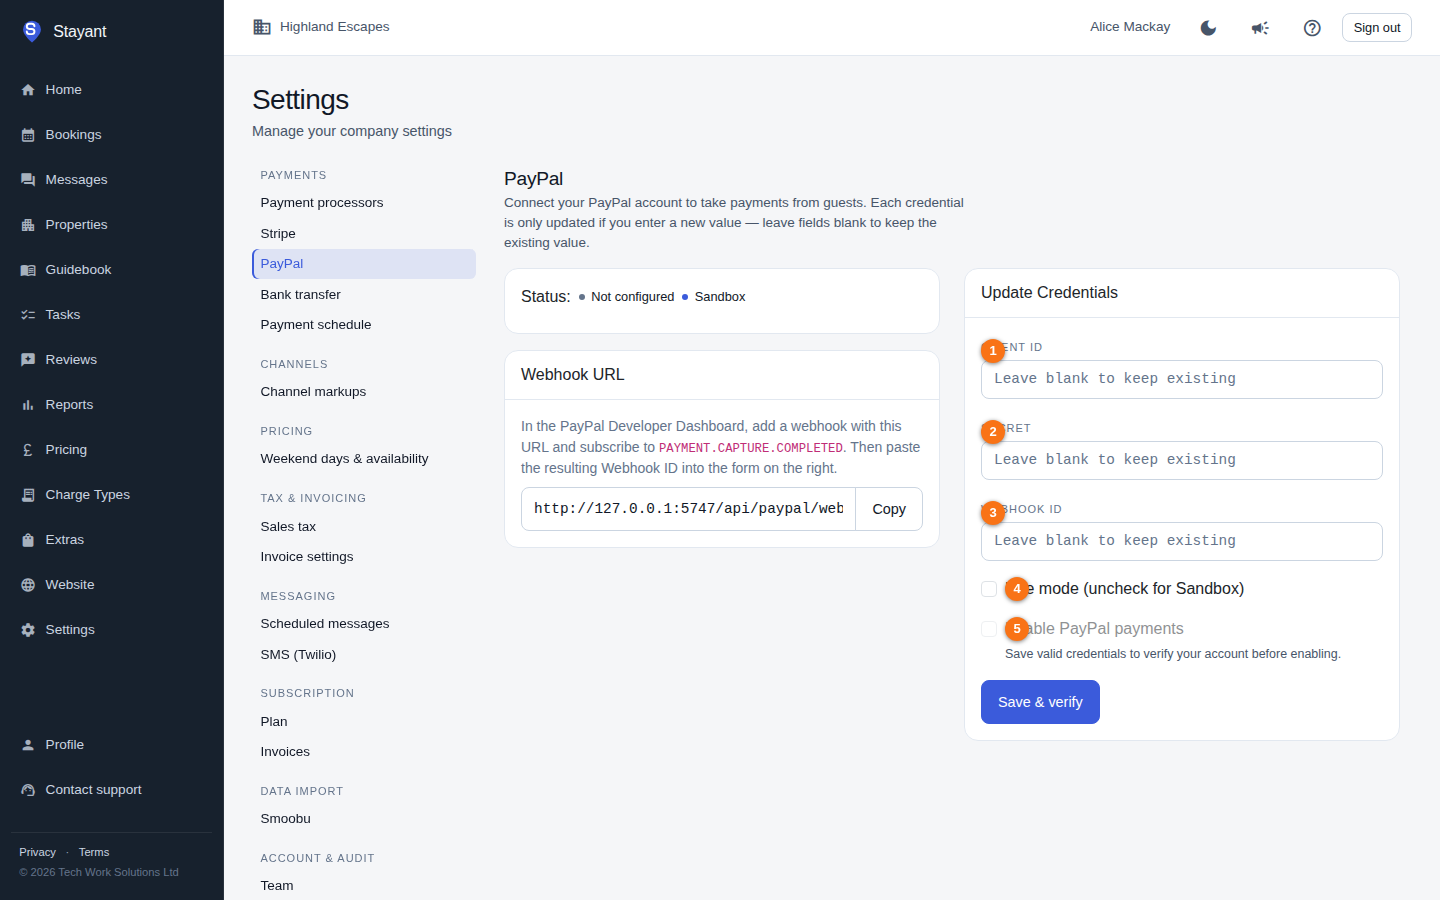
What you'll need from PayPal
From the PayPal Developer Dashboard, collect:
- Client ID — your app's public identifier.
- Secret — the matching private credential; treat it like a password.
- Webhook ID — issued after you create a webhook (see below).
PayPal provides separate credentials for Sandbox (testing) and Live. Use the Live mode checkbox to tell Stayant which set of credentials you've entered: tick it for live credentials, leave it unticked to run against the Sandbox.
Entering your credentials
In the Update Credentials card on the right:
- Paste your Client ID.
- Paste your Secret (the field is masked).
- Paste your Webhook ID once you have it (see Setting up the webhook).
- Tick Live mode for live credentials, or leave it unticked for Sandbox.
- Click Save & verify.
- Once it verifies, tick Enable PayPal payments and save again.
Each credential is only updated if you enter a new value — leave a field blank to keep the value already on file. After saving, the entered values are cleared and the summary card shows masked versions.
Save & verify
Clicking Save does more than store your credentials — Stayant runs a live check against PayPal with them before anything else changes. This is why the button reads Save & verify.
- If verification succeeds, the Enable PayPal payments box unlocks (and if it was already ticked, PayPal goes live immediately).
- If verification fails, the Enable PayPal payments box stays locked — you can't turn PayPal on with credentials Stayant hasn't been able to confirm work. A Verification failed badge appears on the left, and the Update Credentials card on the right shows the reason under "We couldn't verify your PayPal credentials: …".
Until your credentials have verified, the Enable PayPal payments checkbox is disabled with a note: Save valid credentials to verify your account before enabling.
If verification fails
Common causes:
- Wrong or mistyped credentials — check the Client ID and Secret against the PayPal Developer Dashboard.
- Live/Sandbox mismatch — the Live mode checkbox has to match the credentials you pasted in. Sandbox credentials checked with Live mode ticked (or live credentials checked with it unticked) will fail verification — fix the checkbox to match your credentials, then save again.
- Rotated or revoked credentials — if you regenerated your Secret in PayPal, paste the new one and save again.
Fix the credentials and click Save & verify again — verification runs every time you save.
If PayPal ever shows Configured — not verified, re-open Settings → PayPal and click Save & verify with your existing (or updated) credentials. Until you do, PayPal is hidden from checkout — guests won't see it as an option.
Status and what the badges mean
The left-hand card shows the current state:
- Active (green) — verified, configured, and enabled; guests can pay with PayPal.
- Verified — not enabled (blue) — your credentials passed the live check but Enable PayPal payments is unticked.
- Verification failed (red) — your last save didn't pass PayPal's live check; see If verification fails above.
- Configured — not verified (amber) — credentials are saved but haven't been verified yet — see the note above.
- Not configured (grey) — nothing saved yet.
A second badge shows the mode: Live (red) or Sandbox (blue). When configured, the card also lists the masked Client ID, masked Webhook ID, and the current mode.
Setting up the webhook
PayPal uses a webhook to notify Stayant when a payment is captured. Once you have an
active account selected, a Webhook URL card shows the URL to register (it includes
your account identifier and points at Stayant's /api/paypal/webhook endpoint).
- Copy the URL with the Copy button.
- In the PayPal Developer Dashboard, add a webhook with that URL.
- Subscribe it to the
PAYMENT.CAPTURE.COMPLETEDevent. - PayPal returns a Webhook ID — paste that into the Webhook ID field in Stayant and save again.